Earlier this month, we added a Sonoff POW R2 smart switch with power monitoring to our washing machine to enable power logging in Home Assistant and to add notifications when a wash has finished.
With most of the main household appliances and computers being monitored in Home Assistant, this only left our loft workshop without any energy monitoring.
We have a small fuse box with two RCBO (Residual Current Breaker with Over-Current) breakers which power the reflow oven and solar thermal pump on one RCBO and the workbench, air compressor and computers on the second RCBO.
I planned to purchase a pair of Sonoff POW R3 high-power smart switches, rated for 25 amps and would have easily taken the current our loft devices use. Still, they are large boxes only available to order from ITEAD STUDIO, with the shipping costs exceeding the actual device costs. We would also have to pay import duty and charges, which would have made the devices very expensive.
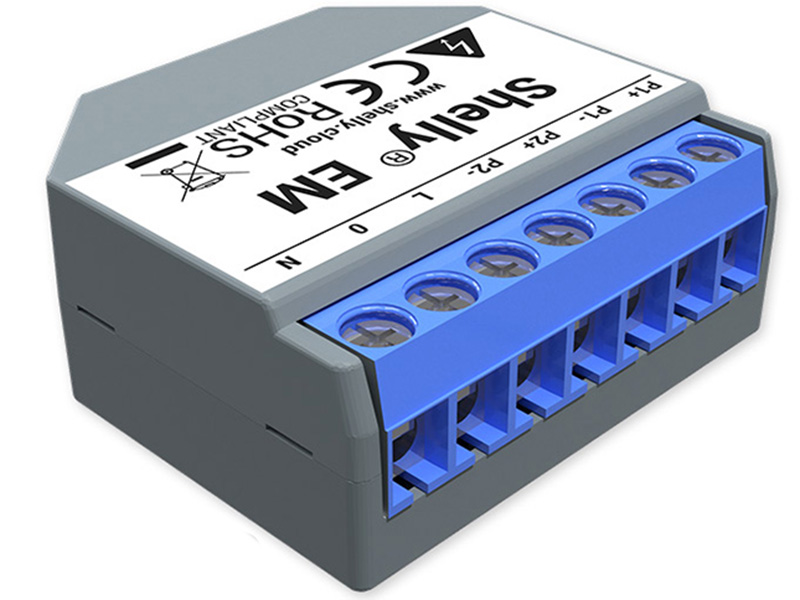
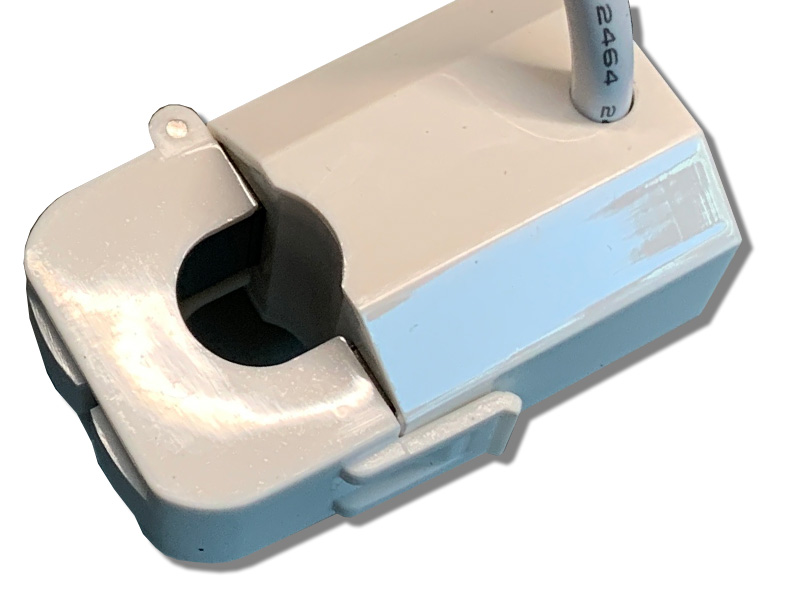
After researching other alternatives, I found the Shelly EM, a very compact device with one or two CT sensors. The CT sensors clip around the mains power wire and don't require the circuit to be broken or modified to use.
Installation
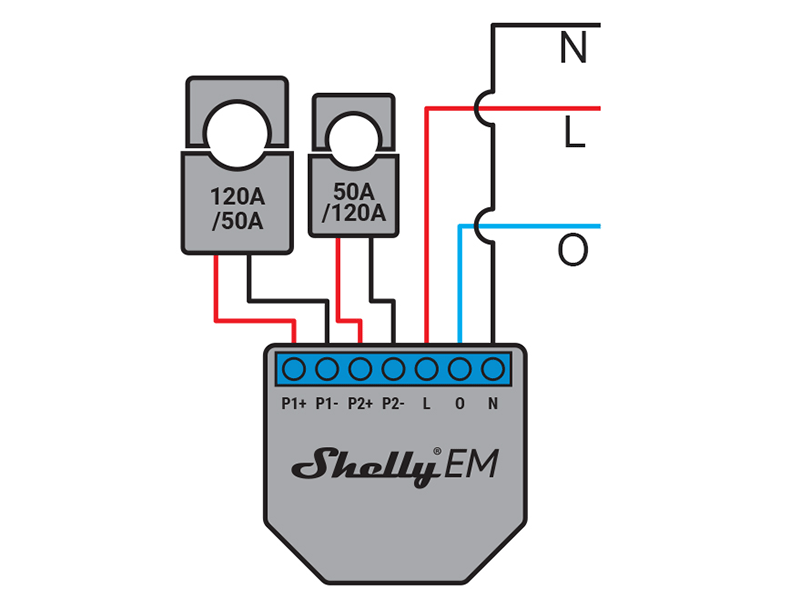
The Shelly EM has a seven-way screw terminal input for the mains live and neutral, a relay output and two inputs for the CT sensors. The device can either be connected to the Shelly Cloud service or via MQTT to a local server to record the data for each channel.
The back of the unit has a reset switch and recessed sockets for flashing new firmware and debugging.
Our fuse box doesn't have much space with the internal wiring and fuses, so fitting the CT sensors involved rerouting the existing cables, and the Shelley EM was fitted into the base of the fuse box.
Mobile App
To set up the Shelly EM, you need to install the Shelly Cloud app on a phone or tablet and register an account with Shelly.
The new device is then added via the app. For me, this took several retries before the new device was registered on our IoT device Wi-Fi network.
The firmware was then updated before continuing, which took several minutes.
All additional configuration was completed via a web browser on the desktop computer.
The Shelly EM Web UI
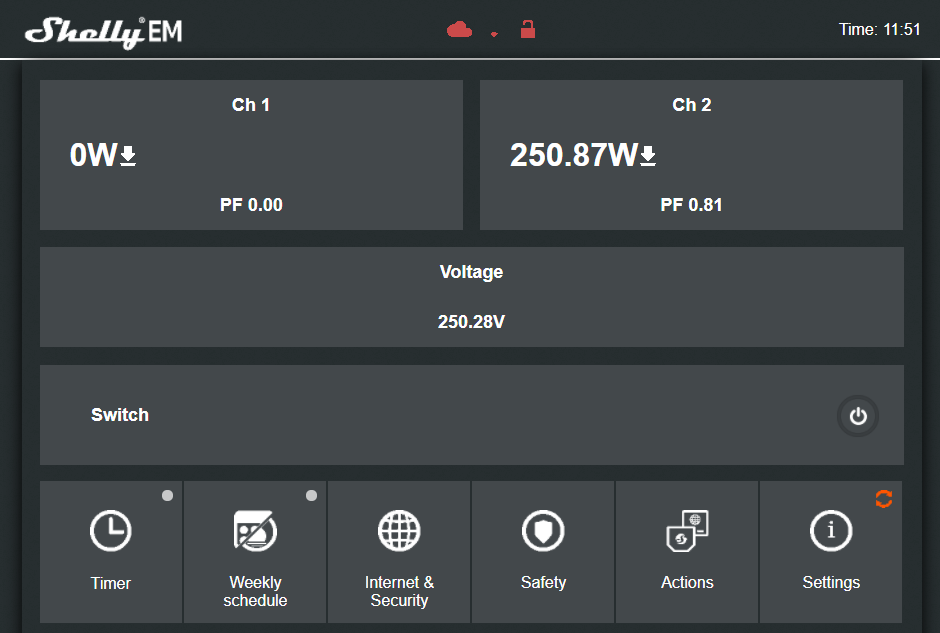
The Shelly EM web interface's main page shows each input's current consumption and power factor, the mains voltage, the switch status and six buttons for changing settings.

Clicking the Settings button opens 14 settings options, each with a drop-down arrow. These include changing the connected current transformer type, which needs to be set to either 50A or 120A, Firmware update, channel names, device reboot and device information.
Enable MQTT
To enable MQTT, you need to open the "Internet & Security" menu and then select "Advanced – Developer Settings", which opens the following new settings options:
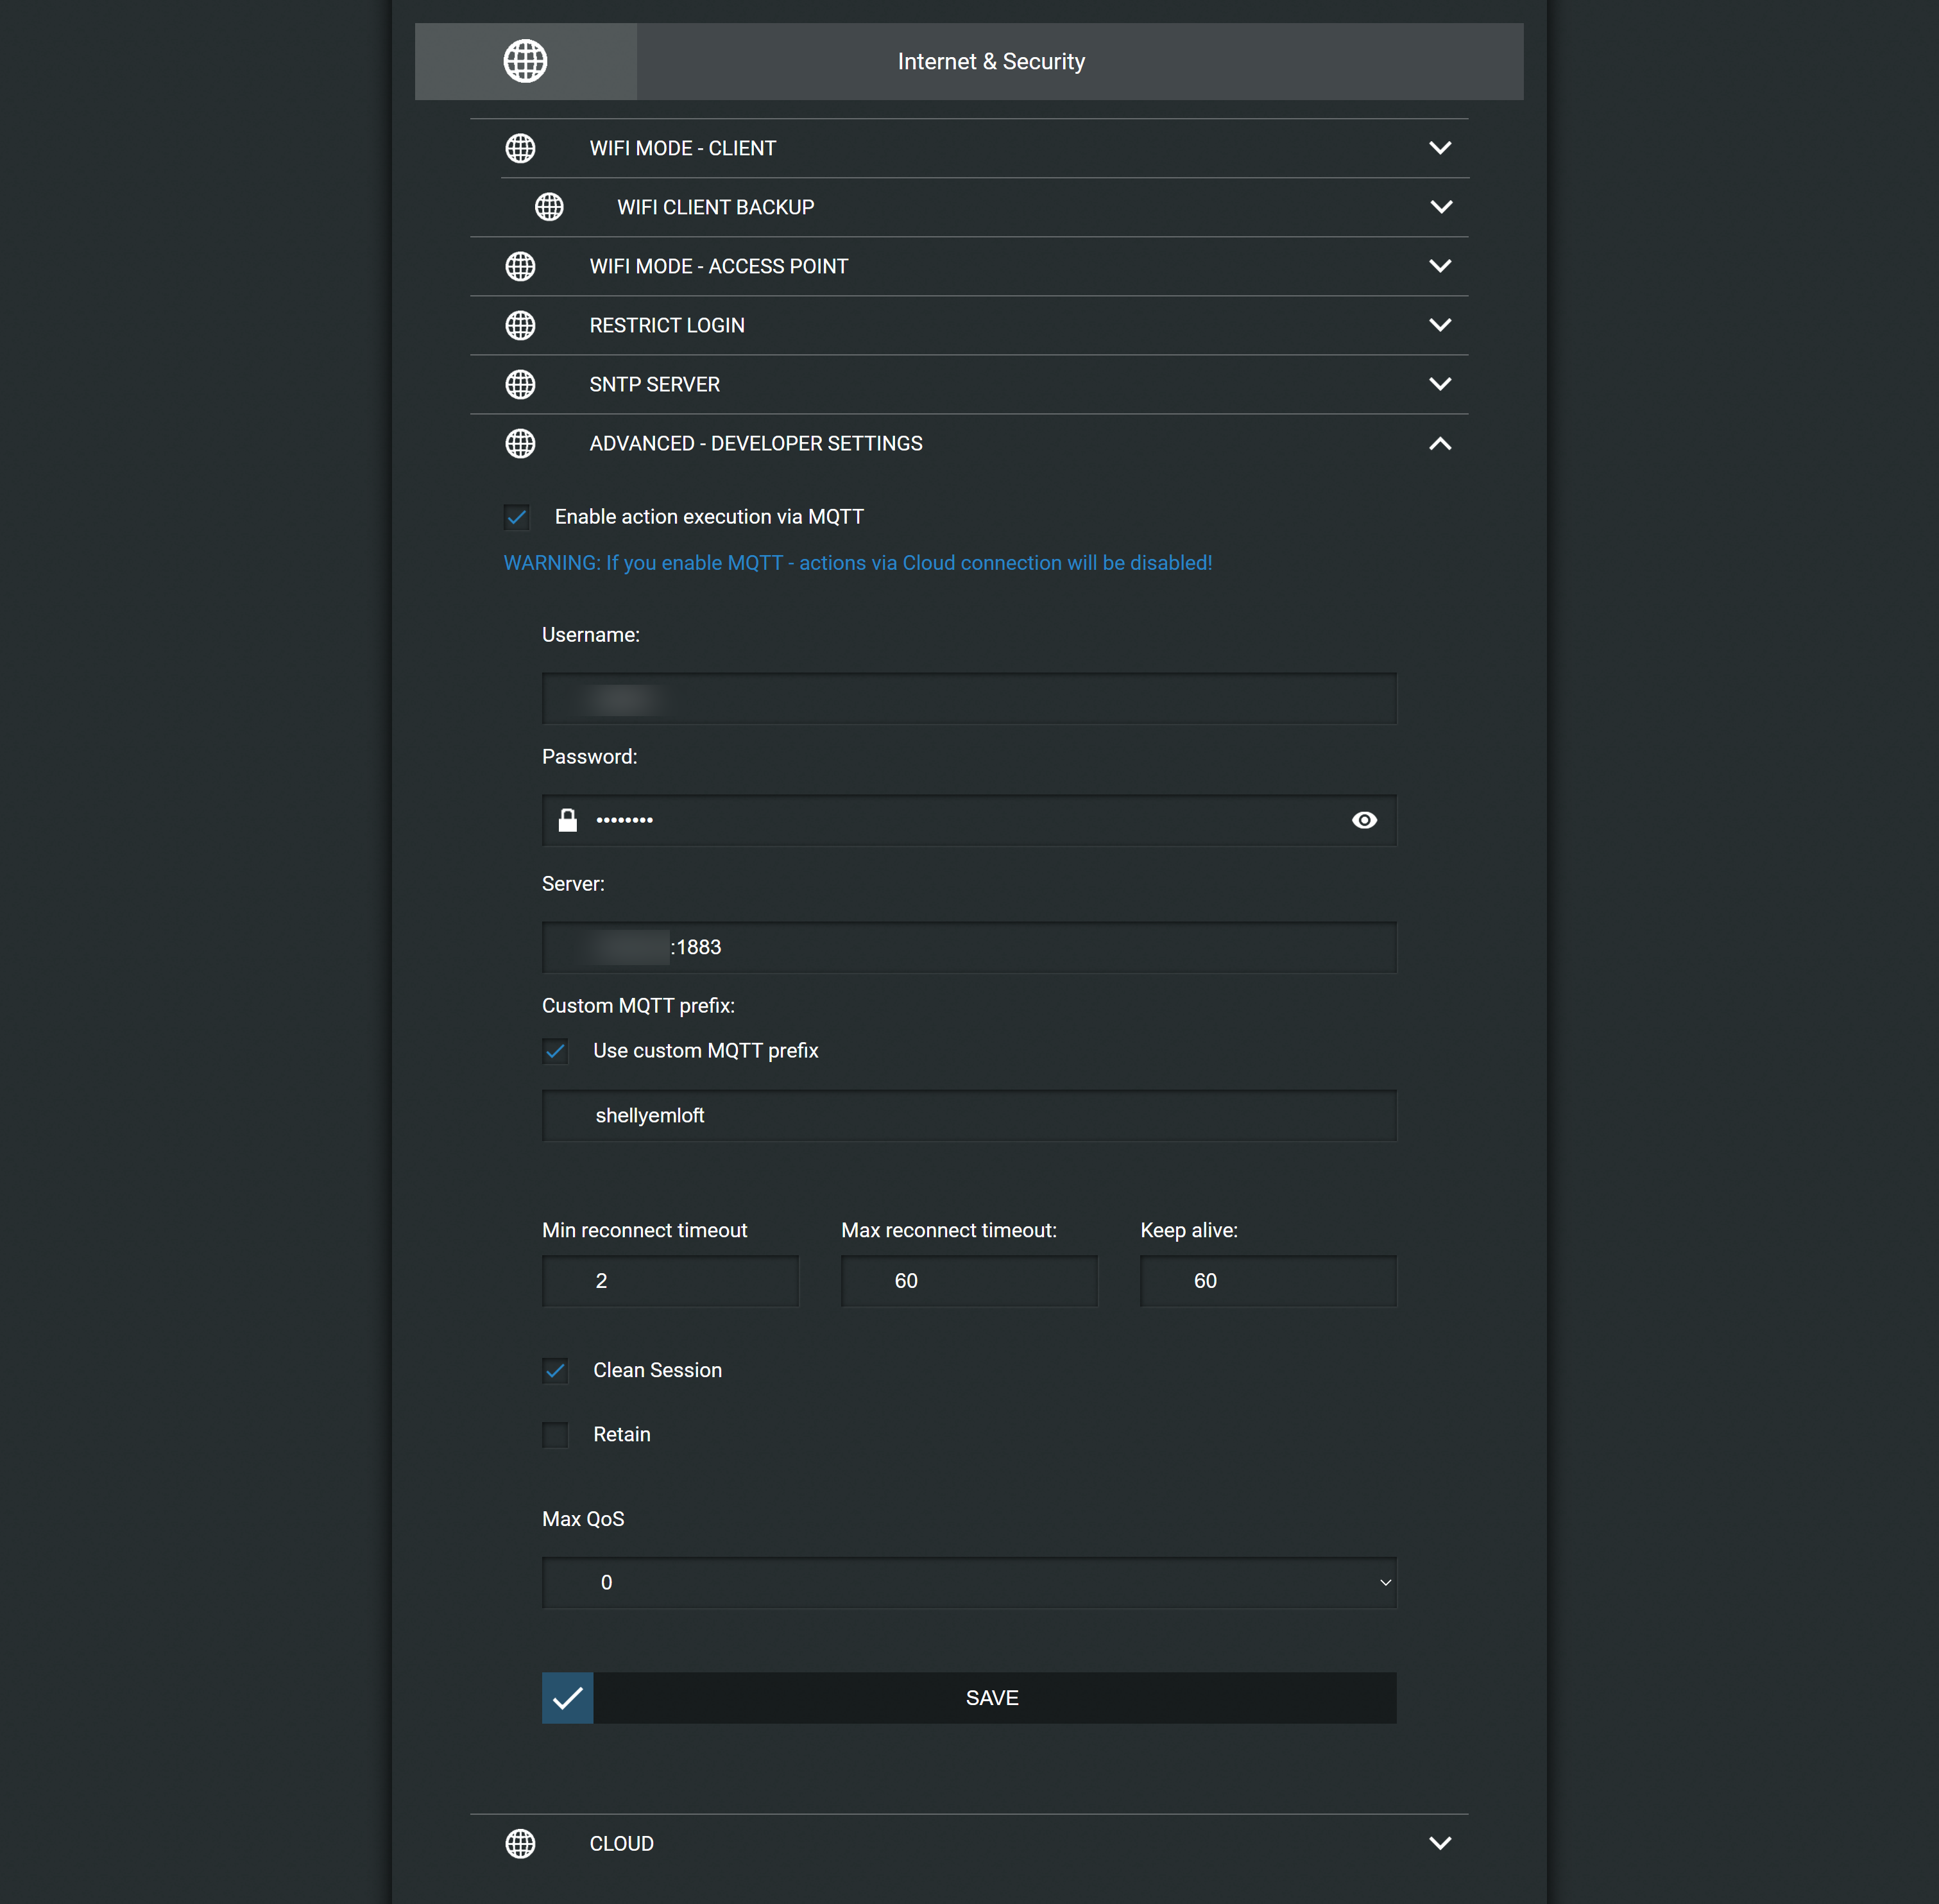
Tick the box for "Enable action execution via MQTT" and enter the username and password for your MQTT server, followed by the server's IP address.
You can add a custom MQTT prefix. I named my unit "shellyemloft"
All the other settings were left as defaults, and after pressing the "Save" button, the unit started to send data to my MQTT server.
Enabling the MQTT output disables the Shelly Cloud service, so the mobile app has minimal information available, as shown in the screenshots below:


Adding Home Assistant Sensors
To add the new data into Home Assistant, I added new MQTT sensors into my sensors.yaml file as follows:
# Shelly Devices
# Sensor 0
- platform: mqtt
  name: "Shelly Loft OvenandPump Line Voltage"
  state_topic: "shellies/shellyemloft/emeter/0/voltage"
  unit_of_measurement: 'V'
  device_class: voltage
- platform: mqtt
  name: "Shelly Loft OvenandPump Real Power"
  state_topic: "shellies/shellyemloft/emeter/0/power"
  unit_of_measurement: 'W'
  device_class: power

- platform: mqtt
  name: "Shelly Loft OvenandPump Reactive Power"
  state_topic: "shellies/shellyemloft/emeter/0/reactive_power"
  unit_of_measurement: 'VAR'

- platform: mqtt
  name: Loft Shelly Oven Total
  state_topic: "shellies/shellyemloft/emeter/0/total"
  value_template: "{{ (value  | float /1000) | round(3)  }}"
  unit_of_measurement: kWh
- platform: template
  sensors:
    shelly_loft_ovenandpump_apparent_power:
      friendly_name: "Shelly Loft Oven and Pump Apparent Power"
      device_class: power
      value_template: "{{ ((states('sensor.shelly_loft_ovenandpump_real_power')|float ** 2) + (states('sensor.shelly_loft_ovenandpump_reactive_power')|float ** 2))|sqrt|round(2) }}"
      unit_of_measurement: 'VA'
    shelly_loft_ovenandpump_power_factor:
      friendly_name: "Shelly Loft Oven and Pump Power Factor"
      device_class: power_factor
      value_template: "{{ ((states('sensor.shelly_loft_ovenandpump_real_power')|float) / (states('sensor.shelly_loft_ovenandpump_apparent_power')|float))|round(2) }}"
    shelly_loft_ovenandpump_current_draw:
      friendly_name: "Shelly Loft Oven and Pump Current Draw"
      device_class: current
      value_template: "{{ ((states('sensor.shelly_loft_ovenandpump_apparent_power')|float) / (states('sensor.shelly_loft_ovenandpump_line_voltage')|float))|round(2) }}"
      unit_of_measurement: 'A'


# Sensor 1
- platform: mqtt
  name: "Shelly Loft Workbench Line Voltage"
  state_topic: "shellies/shellyemloft/emeter/1/voltage"
  unit_of_measurement: 'V'
  device_class: voltage
- platform: mqtt
  name: "Shelly Loft Workbench Real Power"
  state_topic: "shellies/shellyemloft/emeter/1/power"
  unit_of_measurement: 'W'
  device_class: power

- platform: mqtt
  name: "Shelly Loft Workbench Reactive Power"
  state_topic: "shellies/shellyemloft/emeter/1/reactive_power"
  unit_of_measurement: 'VAR'

- platform: mqtt
  name: Loft Shelly Workbench Total
  state_topic: "shellies/shellyemloft/emeter/1/total"
  value_template: "{{ (value  | float /1000) | round(3)  }}"
  unit_of_measurement: kWh
- platform: template
  sensors:
    shelly_loft_workbench_apparent_power:
      friendly_name: "Shelly Loft Workbench Apparent Power"
      device_class: power
      value_template: "{{ ((states('sensor.shelly_loft_workbench_real_power')|float ** 2) + (states('sensor.shelly_loft_workbench_reactive_power')|float ** 2))|sqrt|round(2) }}"
      unit_of_measurement: 'VA'
    shelly_loft_workbench_power_factor:
      friendly_name: "Shelly Loft Workbench Power Factor"
      device_class: power_factor
      value_template: "{{ ((states('sensor.shelly_loft_workbench_real_power')|float) / (states('sensor.shelly_loft_workbench_apparent_power')|float))|round(2) }}"
    shelly_loft_workbench_current_draw:
      friendly_name: "Shelly Loft Workbench Current Draw"
      device_class: current
      value_template: "{{ ((states('sensor.shelly_loft_workbench_apparent_power')|float) / (states('sensor.shelly_loft_workbench_line_voltage')|float))|round(2) }}"
      unit_of_measurement: 'A'
These sensors are based on code on community.home-assistant.io/t/configuring-shelly-em-energy-meter.
I added new Utility Meters into my main configuration to keep long-term stats for each sensor.yaml file as follows:
utility_meter:
  energy_loftoven_usage_daily:
    source: sensor.loft_shelly_oven_total
    cycle: daily
    tariffs:
      - peak

  energy_loftworkbench_usage_daily:
    source: sensor.loft_shelly_workbench_total
    cycle: daily
    tariffs:
      - peak

  energy_loftoven_usage_monthly:
    source: sensor.loft_shelly_oven_total
    cycle: monthly
    tariffs:
      - peak

  energy_loftworkbench_usage_monthly:
    source: sensor.loft_shelly_workbench_total
    cycle: monthly
    tariffs:
      - peak
Front End Tabs in Home Assistant
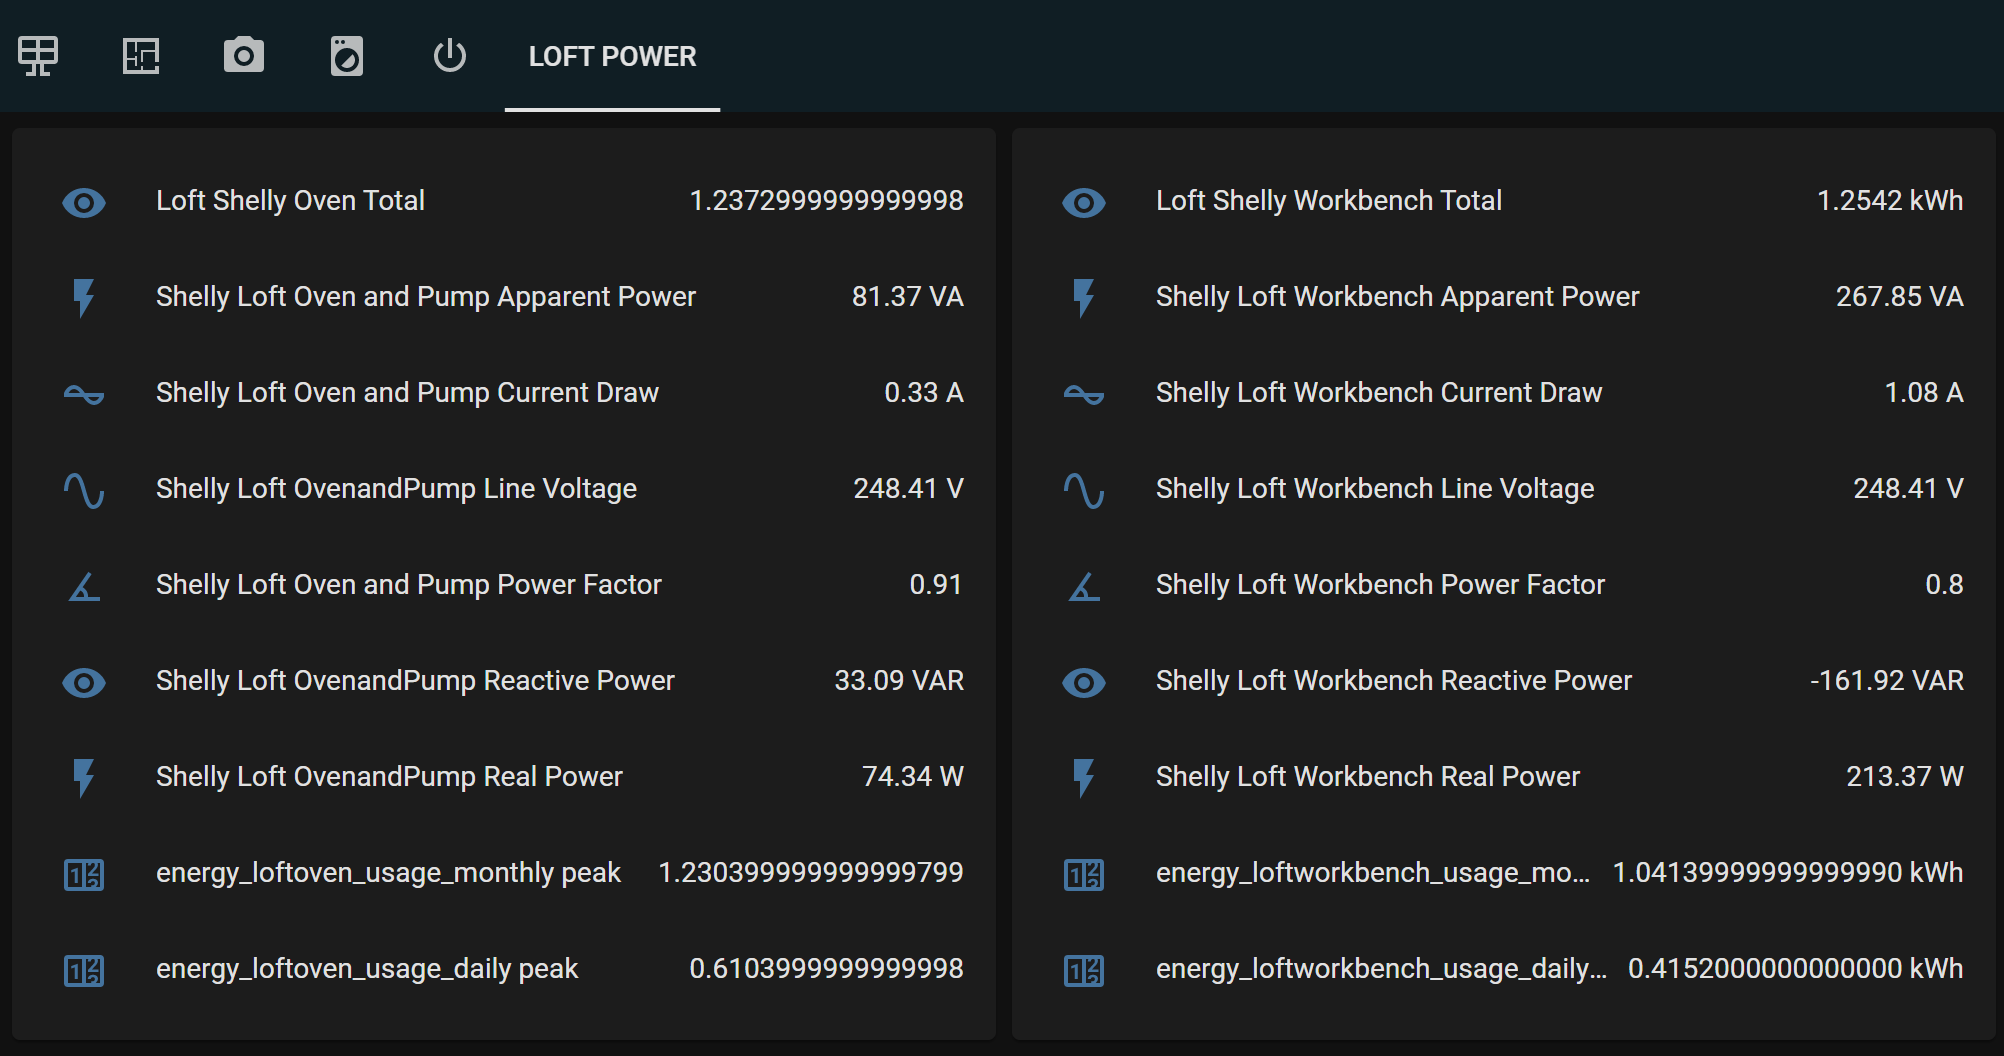
On the Home Assistant user interface, I added a new tab for the loft power sensors and added each sensor with the following code:
type: entities
entities:
  - entity: sensor.loft_shelly_oven_total
  - entity: sensor.shelly_loft_ovenandpump_apparent_power
  - entity: sensor.shelly_loft_ovenandpump_current_draw
  - entity: sensor.shelly_loft_ovenandpump_line_voltage
  - entity: sensor.shelly_loft_ovenandpump_power_factor
  - entity: sensor.shelly_loft_ovenandpump_reactive_power
  - entity: sensor.shelly_loft_ovenandpump_real_power
  - entity: sensor.energy_loftoven_usage_monthly_peak
  - entity: sensor.energy_loftoven_usage_daily_peak


type: entities
entities:
  - entity: sensor.loft_shelly_workbench_total
  - entity: sensor.shelly_loft_workbench_apparent_power
  - entity: sensor.shelly_loft_workbench_current_draw
  - entity: sensor.shelly_loft_workbench_line_voltage
  - entity: sensor.shelly_loft_workbench_power_factor
  - entity: sensor.shelly_loft_workbench_reactive_power
  - entity: sensor.shelly_loft_workbench_real_power
  - entity: sensor.energy_loftworkbench_usage_monthly_peak
  - entity: sensor.energy_loftworkbench_usage_daily_peak
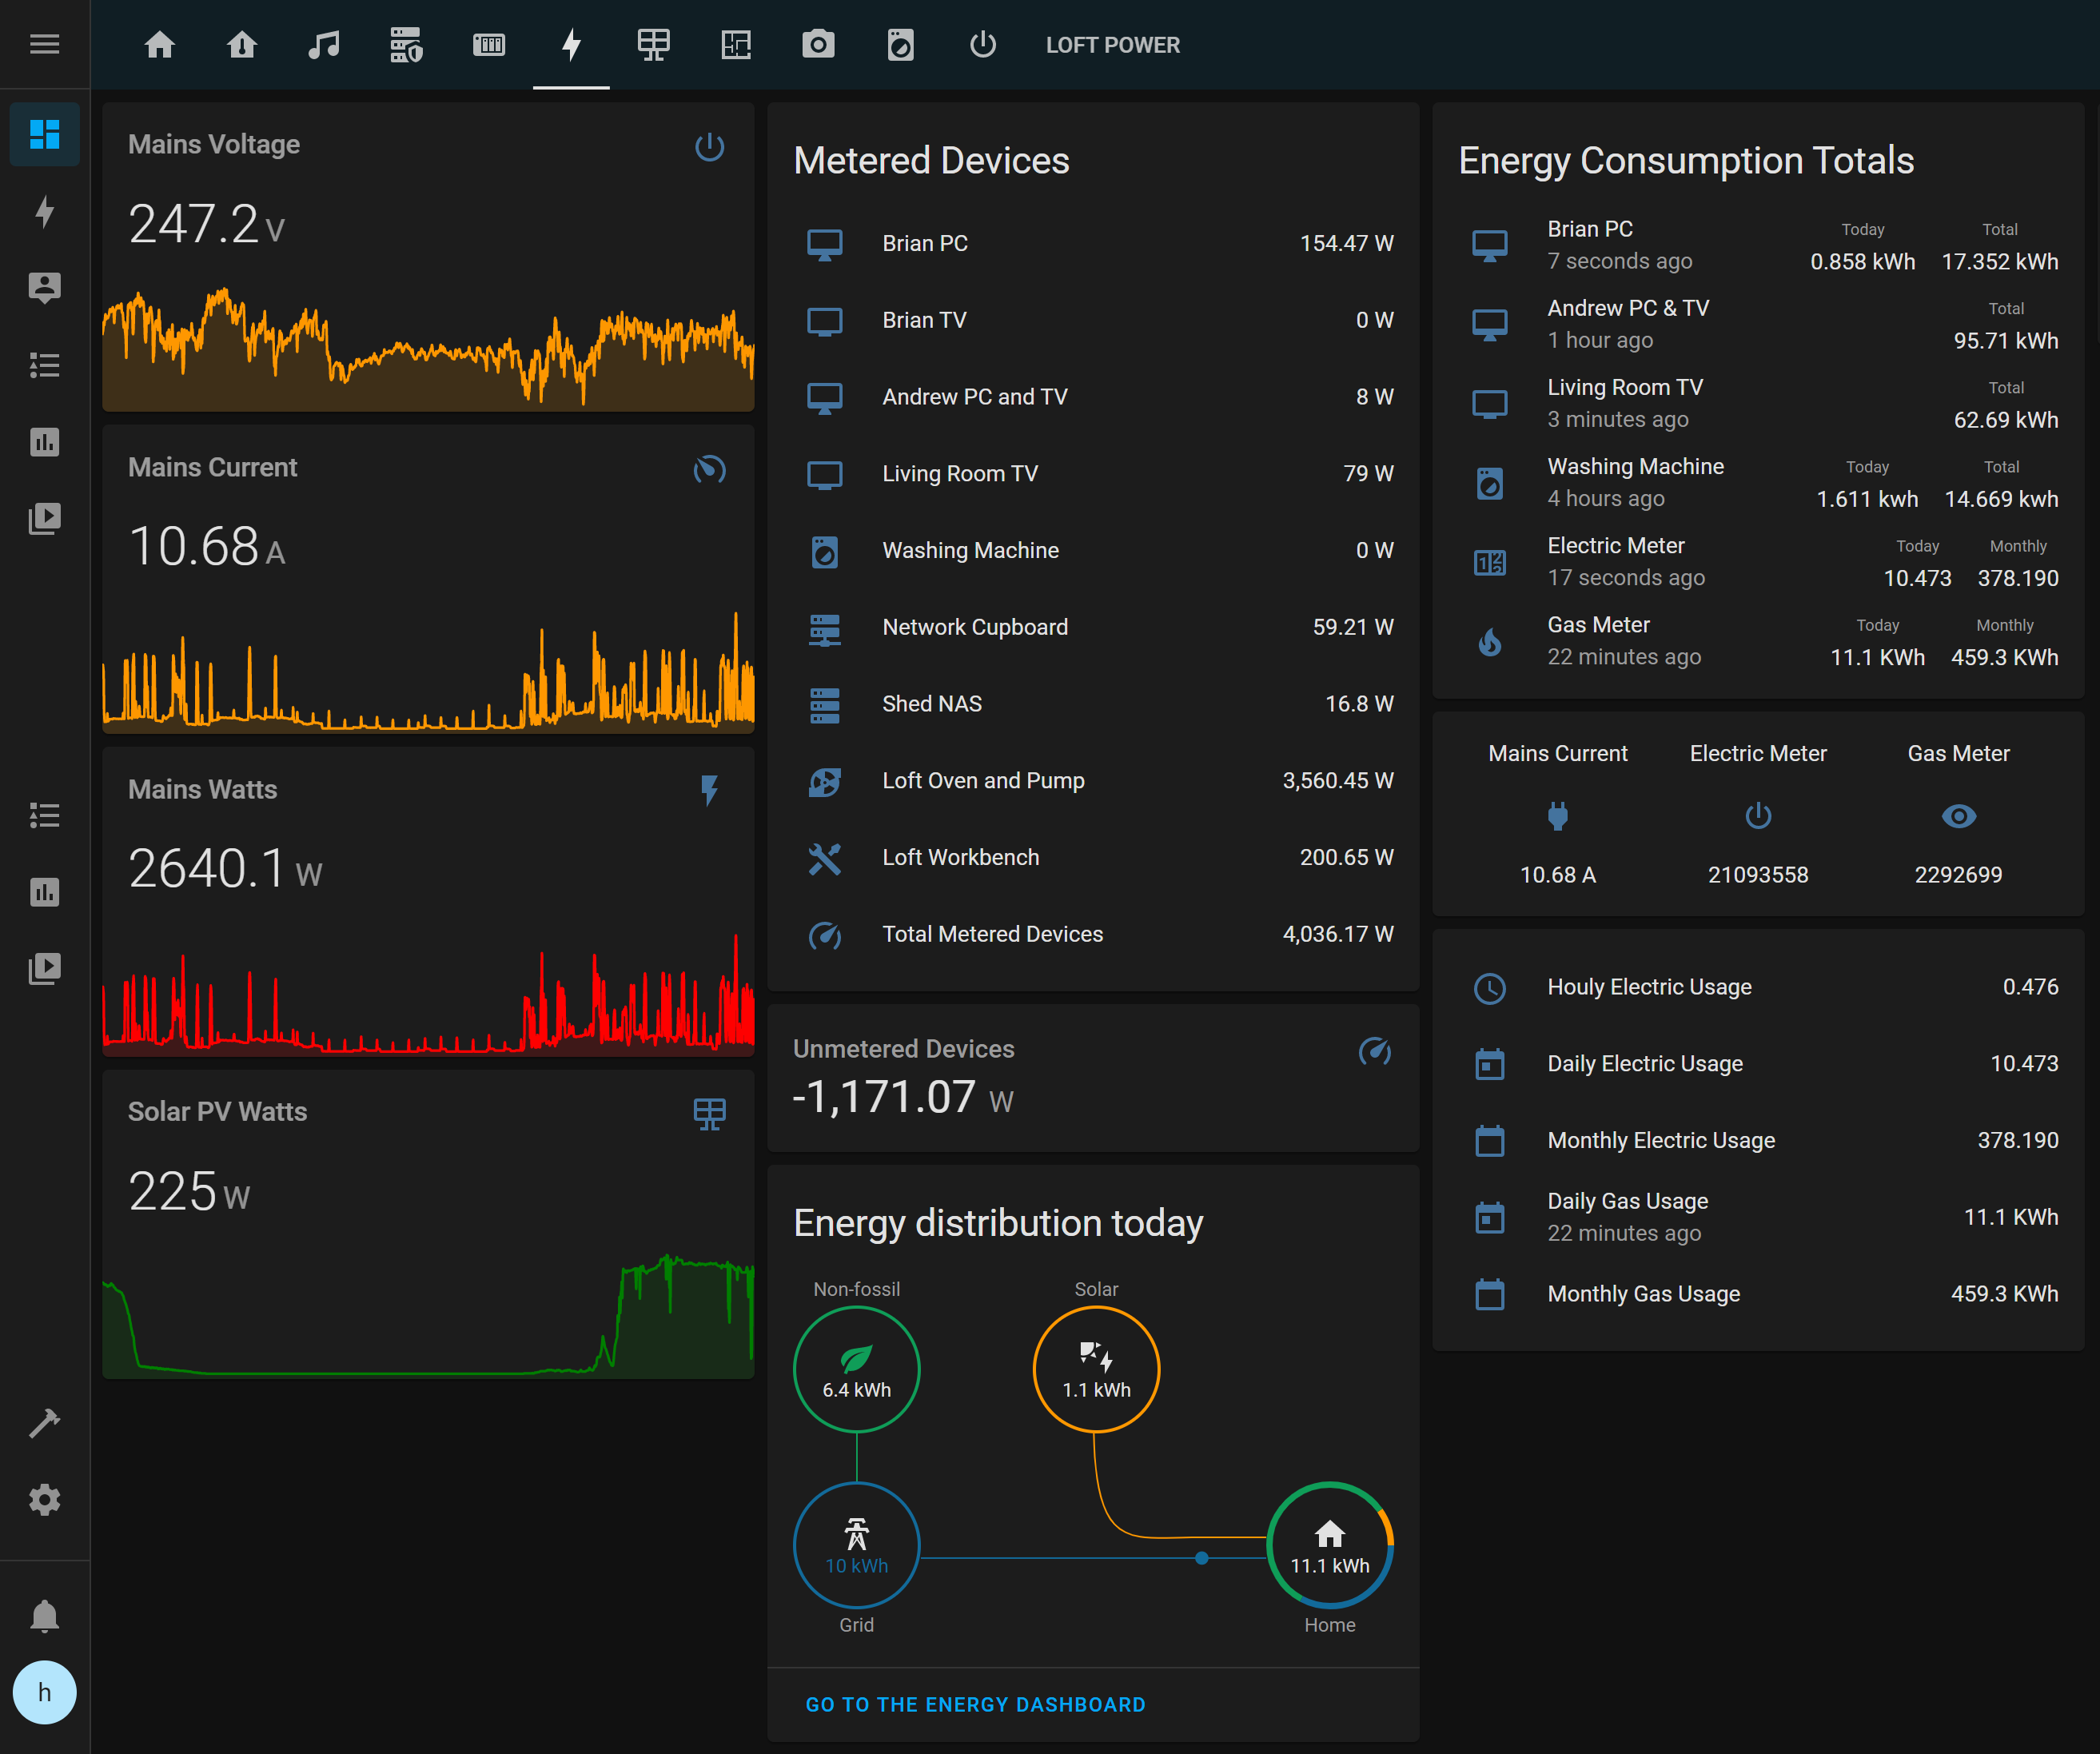
I added the new Metered Devices to the list and the Energy Consumption Totals panels on the existing energy screen.
The new sensors have been added to the Total Metered Devices sensor, which is used to calculate any Unmetered Devices power consumption such as the fridge/freezer, microwave, kettle etc.

Home Assistant Energy Dashboard
To add the new sensors to the new Energy Dashboard, you need to create template sensors with the name starting with "energy". Each template sensor also requires additional attribute templates:
attribute_templates:
        last_reset: '1970-01-01T00:00:00+00:00'
        state_class: measurement
        device_class: energy
      unit_of_measurement: 'kWh'
The complete code for adding the two new Shelly sensors to Home Assistant is as follows:
- platform: template
  sensors:
    shelly_workbench_energy:
      device_class: energy
      friendly_name: "Energy Shelly Loft Workbench"
      attribute_templates:
        last_reset: '1970-01-01T00:00:00+00:00'
        state_class: measurement
        device_class: energy
      unit_of_measurement: 'kWh'
      value_template: "{{ states('sensor.loft_shelly_workbench_total') }}"
      icon_template: mdi:mdi-current-ac

- platform: template
  sensors:
    shelly_oven_energy:
      device_class: energy
      friendly_name: "Energy Shelly Loft Oven"
      attribute_templates:
        last_reset: '1970-01-01T00:00:00+00:00'
        state_class: measurement
        device_class: energy
      unit_of_measurement: 'kWh'
      value_template: "{{ states('sensor.loft_shelly_oven_total') }}"
      icon_template: mdi:mdi-current-ac

Elros
Thank you so much for this post
It saved me hours of research.
Steve
Hi do you reply to the comments?
Thanks for this I might try this tonight.
I set up my Shelly em using the integration but might swap to this way.
Why do you need to create the last sensor to add into the Energy dashboard? I just added one of the sensors the integration created.
What is the last reset for in the code ?
I read I needed to add a availability line into the sensors as it resets even rebooting similar to this..
availability_template: "{{ states('sensor.total_yield') not in ['unavailable', 'unknown', 'none'] }}"
Thanks
Brian
Steve, The last_reset attribute is needed for the energy logging in Home Assistant, it is one of the required values for energy sensors.
Steve
Thanks for the reply Brian.
So I'm guessing my utility meter sensors aren't accurate as they are now using the sensors created by the integration?
What do you think about availability template line above , is this something you've seen or recommend.
Thanks
Brian
I haven't seen anything about changing the templates, as mine is working I didn't want to try changing it to the different format.