Since upgrading our solar PV array in July, we have had an excess of energy throughout the day, which was fed back into the mains grid.
With the removal of our previous solar thermal system, we no longer had heating energy going into the hot water cylinder.
To make the best use of the excess solar PV energy, we ordered a solar power diverter which monitors the incoming mains electricity. If the electric flow reverses, the excess is sent to the immersion heating element in the hot water cylinder rather than being lost to the grid.
We looked at several different models of solar power diverters, and the myenergi eddi was the model with the best reviews and integrations available with the Home Assistant software we use to monitor the house.
We ordered the myenergi eddi from Cool Energy at the start of June. Due to the ongoing supply chain issues with electronic components, they were only available on a pre-order basis.
When we placed the order, it was for the original eddi 1.0 model, which did not have Wi-Fi and ethernet connectivity. We would have to buy the internet connection module from myenergi to enable data collection and internet access.
When the order shipped in August, the newer eddi 2.1 Solar Power Diverter, model number CE-EDDI-16A1P02H, was sent, which now has built-in Wi-Fi and ethernet ports.
In the eddi 2.1 box was the eddi unit, a metal wall bracket, a CT sensor, 2 antennas, screws and instruction leaflets.

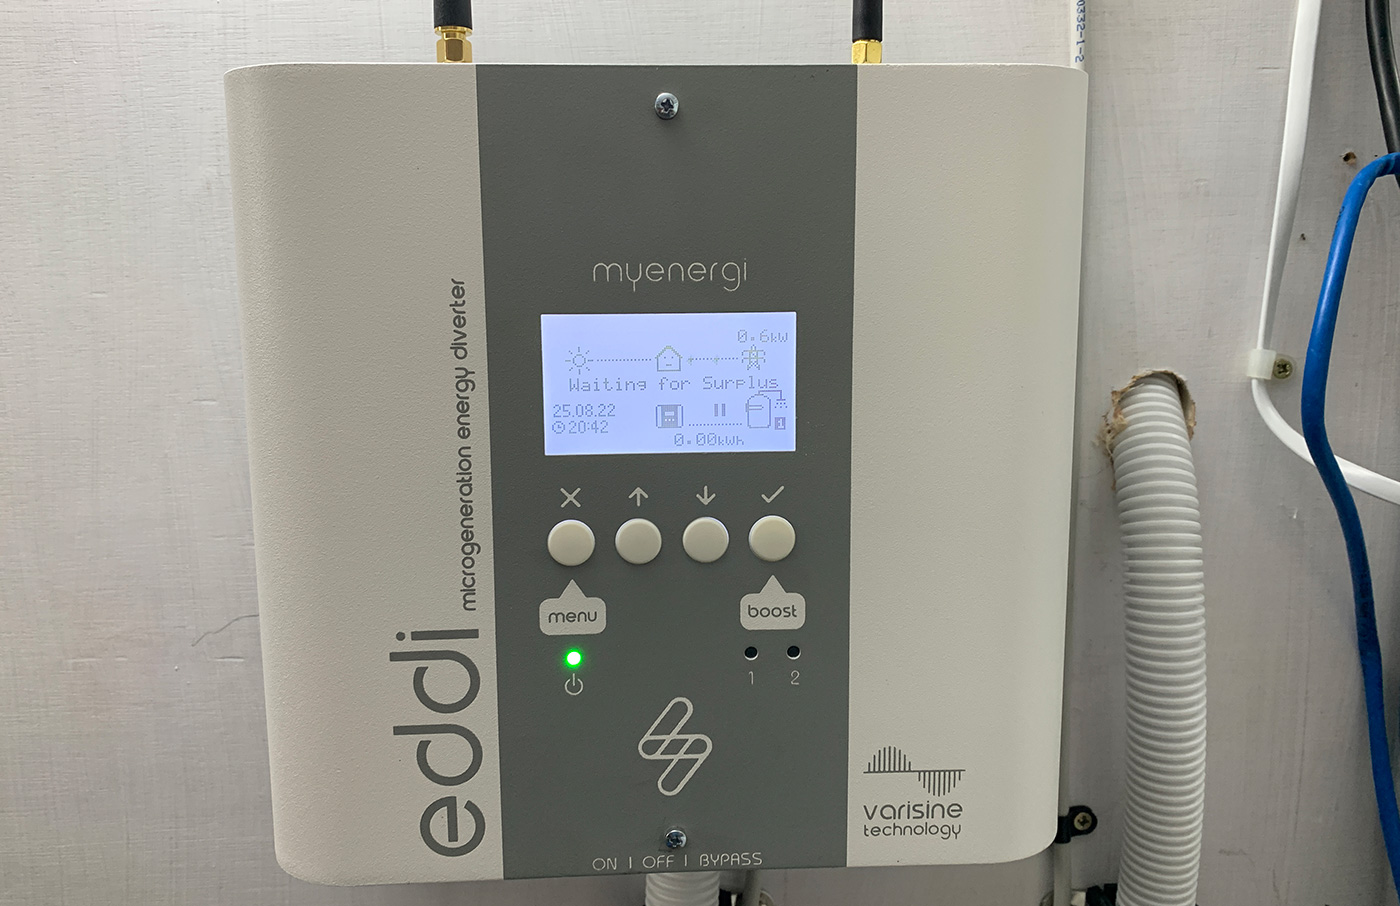
eddi installation
The eddi was installed in the basement shed, with our solar PV inverter and a secondary fuse box with a 4mm twin and earth cable running to the immersion heater element in the water tank.
The metal bracket was fitted to the side of our server rack stand with four M5 bolts, and the cables were routed into the unit's base via a flexible plastic conduit.
The current transformer clamp fits the mains' incoming live cable from the electric meter to the fuse box at the front of the house. The location of the eddi is under the house at the back, so we had to extend the supplied cable.
When we installed the new fuse box in the basement shed earlier this year, we ran a 16mm armoured cable for the mains electricity and a Cat 6 network cable to use with the solar diverter sensor. The sensor needs to be connected using twisted-pair wires, which is ideal for the application.
The eddi was connected to the fuse box via a new RCBO (Residual Current Breaker with Over-Current), and once this was all installed, we powered on the eddi and started the Wi-Fi setup procedure.
Setting up Wi-Fi and myenergi account
With the eddi powered on, first, you must select if it is a new device or an additional device on the myenergi network. As this is our first myenergi product, we selected "1st device installed."
To access the Wi-Fi settings, you need to navigate to: "Other Settings > Internet > Wi-Fi> Wi-Fi Config" using the menu and control buttons.
If Wi-Fi is turned off, toggle the setting with the + button and then scroll down to "Access Point", which should be turned on by default.
The screen will show the Wi-Fi network SSID and password; you need to connect to this on a mobile phone or computer.
A browser screen will prompt you for a new password, and the web page will reload with a Wi-Fi setup screen allowing you to select from one of the available networks. Select your network, enter your Wi-Fi password, and click the Connect button to continue.
I next set up a new account on myaccount.myenergi.com and added my eddi device to the account so the data can be accessed online.
Adding the eddi to Home Assistant
Before adding the eddi to Home Assistant, I needed to generate an API key for the device in the myenergi account page myaccount.myenergi.com. This page at support.myenergi.com explains how to create the API key.
A custom component is available at github.com/CJNE/ha-myenergi to communicate with myenergi devices and home assistant.
After downloading the archive from Github, I extracted the contents of the custom_components folder into my home assistant's custom_components folder and restarted Home Assistant and added the new component with Home Assistant, go to "Configuration" -> "Integrations" click "+" and then search for "myenergi".
The screen will ask for your API key and add the myenergi device to Home Assistant as eddi and Hub devices.
The new entities can now be added to your Home Assistant views.
First day immersion heater problems
For the first full day with the eddi diverting unused energy from our solar PV system, we found that the water in the top 30 cm of our water tank was over 50C after a few hours, but the rest of the tank was much colder.
When we installed the dual coil hot water cylinder in 2012, we fitted a short 14" (35cm) element as we didn't plan to use this unless there was an emergency. As we now wanted to heat the entire tank using the heating element, we purchased a new Tesla titanium 27" (68cm) immersion heater element from Screwfix.
Removing the old heating element proved very difficult as the copper threads had corroded to the body of the element, and unknown to us at the time, the removal had caused a small crack to appear between the mounting flange and the thin copper walls of the cylinder which resulted in a small water leak once the new immersion heater element was installed and filled again with water.
After trying a different seal, we traced the leak to the edge of the mounting flange and decided to try to fix this using solder. The copper was cleaned and using a gas flame torch, the metal was heated, and solder was applied to seal the crack. After 24 hours, this appears to be holding water and isn't leaking, but I plan to check it every day in case it leaks again.

A new hot water cylinder would cost around £250, have different plumbing fitting locations and wouldn't be available for several days, so we hope the repair works.
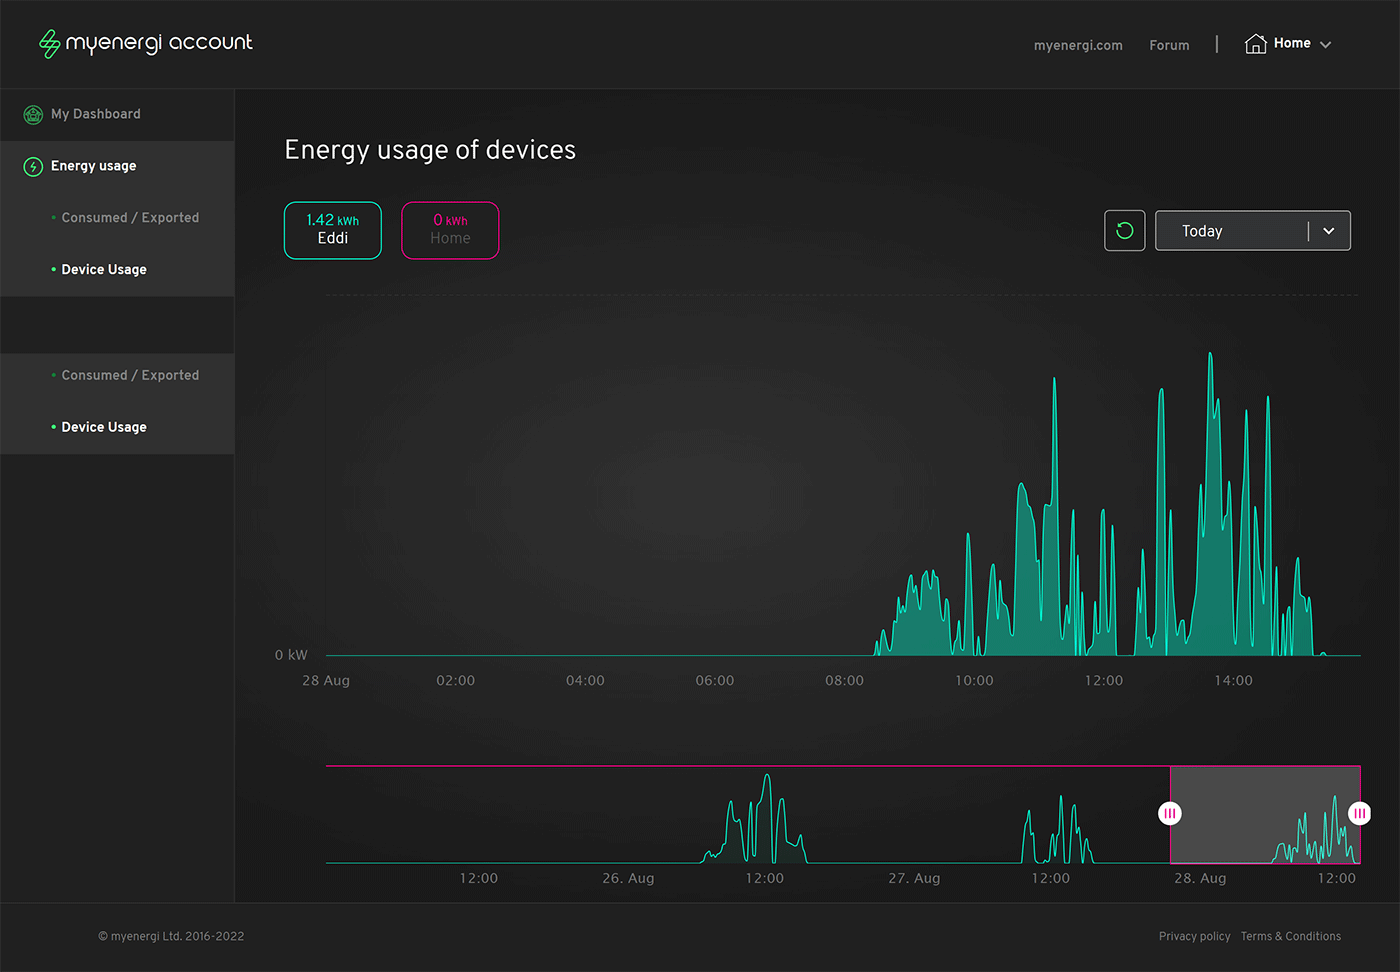
myenergi account website reports
The myenergi account website has basic reports for energy usage of the eddi device at myaccount.myenergi.com/energy#usage
The imported numbers match our energy logging system with the eddi reports showing varying energy consumption throughout the day being sent to the heating element.
Once the system has been running for a longer time, we will have a much better overview of the benefits of the system.

Martin N Brown
Hello,
Interesting article about the Eddi MK2.1. Don’t know if you give out tips, but I have just fitted one, having had PV solar installed on the house.
(However, we have the electric meter running backwards at present - will inform supply tomorrow. Don’t know if this is the issue).
Could you confirm the standard settings for the CT’s
CT Config: Internal load
CT1: Grid. ( CT coil fitted to consumer box live cable)
CT2: Generation Only. ( CT coil fitted to PV a.c ) seems to be working.
How have you set CT Config, and do you get any power readings from this - as you do with CT 1 & 2
The sun was out today Sunday 2nd April, but no sign of the surplus power being sent to the immersion heater?
Any tips welcome - could be another setting?
I am also in contact with Myenergi support - awaiting reply.
Kind regards,
Martin
Kempston
Bedford
Brian
Hello Martin
We only used a single CT coil collected to the eddi on our install so I dont know the configuration for a dual CT install.
We didnt change any of the default settings on the eddi when we fitted it.
Could the wires on your CTs be backwards causing you to not get any power readings?